This guide explains what overmolding is, how the process works step-by-step, when to choose it over alternatives like insert molding, critical design considerations, and real-world applications across industries.
Key Takeaways
- Bonds thermoplastic elastomer or rubber onto pre-molded substrates using two-stage injection molding
- Combines hard and soft materials, multiple colors, or integrated seals impossible with single-material parts
- Requires material compatibility, substrate design with undercuts, and proper wall thickness ratios
- Used in medical device handles, power tool grips, automotive trim, and consumer electronics
What Is Overmolding?
Overmolding is a two-stage injection molding process where a rigid substrate part is molded first, then positioned in a second mold cavity. Additional material—typically a thermoplastic elastomer (TPE), thermoplastic polyurethane (TPU), or silicone—is injected directly onto or around the substrate.
The result is a single, integrated multi-material component where the overmolded layer bonds mechanically and/or chemically to the substrate without requiring assembly steps or adhesives.
This process goes by different names depending on the equipment and materials used. Two-shot molding refers to both materials being molded within the same machine cycle using specialized multi-barrel equipment, while multi-shot molding involves more than two materials.
Unlike standard injection molding that produces parts from one material, overmolding intentionally combines different materials to use their distinct properties:
- Rigid + flexible combinations for ergonomic grips
- Different colors for aesthetic contrast or branding
- Different textures for tactile feedback or improved handling
- Integrated seals for waterproofing or vibration damping
Manufacturers choose overmolding for several key advantages:
- Eliminates assembly steps and adhesive bonding
- Creates stronger mechanical and chemical bonds between materials
- Enables complex multi-material designs with improved ergonomics
- Reduces overall production costs despite higher initial tooling investment
The global overmolding service market is projected to grow from $1.2 billion in 2024 to $2.5 billion by 2033, driven by demand for integrated functionality in medical and automotive applications.
How the Overmolding Process Works
Overmolding requires two sets of tooling—one for the substrate and one for the overmold—and careful timing to ensure proper material bonding and part quality. The process can be executed in two ways: sequential molding (substrate molded, cooled, and manually or robotically transferred to a second mold) or two-shot molding (both operations completed in one machine with rotating platens or sliding cores).
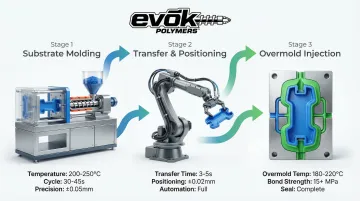
Step 1: Substrate Molding
The first material is typically a rigid thermoplastic like ABS (acrylonitrile butadiene styrene), PC (polycarbonate), nylon, or PP (polypropylene). This material is injection molded to create the substrate part.
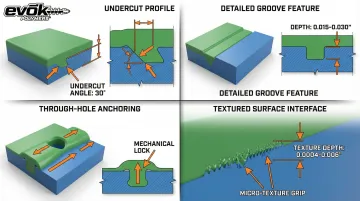
The substrate must be designed with features that promote mechanical bonding:
- Undercuts that create physical interlocking
- Grooves (typically 0.015"–0.030" deep) along edges for positive shut-off
- Through-holes allowing overmold material to anchor on opposite sides
- Surface texturing to increase contact area and friction
The substrate is allowed to cool sufficiently to maintain dimensional stability, though it may be transferred while still slightly warm to improve bonding with the overmold material.
Minimizing the delay between the first and second shot is critical. A hot substrate promotes molecular diffusion and chemical bonding at the interface.
Step 2: Substrate Transfer and Positioning
The substrate is removed from the first mold and precisely positioned in the second mold cavity. This transfer can be:
- Manual for low-volume production
- Robotic for high-volume or high-precision applications (positioning accuracy <1 mm)
- Automatic rotation in two-shot machines where the mold rotates 180° to align the substrate with the second injection unit
Positioning accuracy is critical: misalignment results in flash (excess material), incomplete coverage, or weak bonds that lead to delamination.
Step 3: Overmold Material Injection
Once the substrate is precisely positioned, the second material is injected into the mold. The second material (typically TPE, TPU, silicone, or liquid silicone rubber) flows around and bonds to the substrate.
Process parameters are carefully optimized:
- Temperature: Melt temperature must be high enough for complete fill but not so high that it warps the substrate
- Pressure: Injection pressure must be sufficient to fill the cavity without displacing the substrate
- Injection speed: The overmold should be injected as fast as possible without causing substrate movement or air entrapment
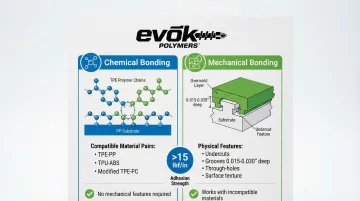
The overmolded layer cools and solidifies, bonding mechanically (via undercuts and texture) or chemically (via material compatibility) to the substrate. Bonding success depends on:
- Material pairing: Some material combinations bond chemically (TPE to polypropylene), while others require mechanical interlocking
- Substrate surface preparation: Surfaces must be free of mold release agents, grease, and contamination
- Mold design: Gate location, venting, and cooling channels must ensure complete fill and proper bonding
Excellent adhesion is defined as peel strength >15 lbf/in, while values <10 lbf/in indicate poor bonding.
Always consult material supplier compatibility charts and conduct bond strength testing during development.
Overmolding vs. Insert Molding: Understanding the Difference
While often confused, overmolding and insert molding serve different purposes—though they can be combined in hybrid applications.
Insert molding places a pre-fabricated component into a mold, then injects plastic around it to encapsulate or secure it. These inserts are typically metal (threaded inserts, pins, contacts) or electronics (PCBs, wire harnesses).
The distinction lies in the substrate: overmolding uses molded plastic as the base, while insert molding embeds non-molded components manufactured separately.
When to Use Each Process
Choose overmolding when:
- Combining two molded plastic/elastomer materials for ergonomic grips
- Creating color contrast or visual differentiation
- Adding soft-touch surfaces for comfort
- Integrating seals or gaskets directly into the part
Choose insert molding when:
- Embedding metal components for structural strength or electrical conductivity
- Encapsulating electronics for environmental protection
- Integrating threaded fasteners for assembly
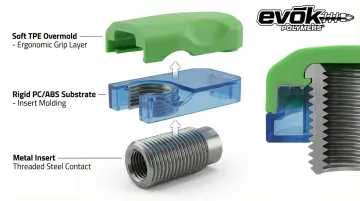
Hybrid approaches combine both techniques. A metal insert is embedded in rigid plastic (insert molding), then a TPE grip is overmolded onto the assembly.
Common hybrid examples:
- Surgical instruments with metal cores, rigid housings, and soft rubber grips
- Electronic devices where PCBs are encapsulated, then overmolded with protective TPU shells
- Power tools combining metal fasteners, structural plastic, and ergonomic overmolded handles
Common Applications of Overmolding
Overmolding excels in applications where ergonomics, durability, and user comfort are critical. The process allows manufacturers to combine material properties strategically—placing rigid structures where strength is needed and soft materials where grip or cushioning matters.
Medical Devices
Medical applications demand biocompatible materials and ergonomic designs that reduce user fatigue during extended procedures:
- Surgical instruments with soft-grip handles
- Diagnostic equipment with ergonomic touchpoints
- Wearable device enclosures with skin-safe contact zones
- Integrated seals eliminating separate O-rings
Consumer Products
Consumer goods leverage overmolding to enhance grip, comfort, and visual appeal across everyday items:
- Toothbrushes (hard handle + soft grip zones)
- Razors with cushioned grip surfaces
- Kitchen utensils with non-slip handles
- Power tool handles with vibration-damping layers
- Sporting goods (golf club grips, bicycle handlebar grips)
- Smartphone cases with shock-absorbing bumpers
Automotive and Industrial
Industrial and automotive applications use overmolding to improve operator comfort and integrate functional features like seals directly into components:
- Steering wheel covers with soft-touch surfaces
- Gear shift knobs with ergonomic grip zones
- Dashboard components with tactile buttons
- Seals and gaskets integrated directly into housings
- Control panels with color-coded, textured buttons
- Protective bumpers on equipment housings
Key Design Considerations for Overmolding Success
Design flaws in overmolding cause bond failures, dimensional instability, and costly mold rework. Success hinges on three factors: material compatibility, mechanical bonding features, and dimensional precision.
Material Compatibility and Bonding
Material selection determines bond strength. Chemical bonding occurs when substrate and overmold materials have molecular affinity—leading suppliers like Teknor Apex and Avient offer adhesion-modified TPE grades that bond chemically to engineering resins (PC, ABS, nylon) without primers.
Common material pairings:
- TPE (styrenic) over PP or PE: Natural chemical bond
- Modified TPE over PC, ABS, or nylon: Requires adhesion-modified grades
- TPU over ABS or PC: Excellent abrasion resistance and strong chemical bond
- Silicone over various substrates: Typically requires mechanical bonding
Always consult material supplier compatibility charts before finalizing material selection.
When chemical bonding alone won't suffice, designers must incorporate physical locking features into the substrate geometry.
Mechanical Interlocking Features
Design the substrate with features that physically lock the overmold in place:
- Undercuts: Create positive mechanical locks that prevent the overmold from peeling
- Grooves: 0.015"–0.030" (0.38–0.76 mm) deep grooves along edges provide shut-off and prevent flash
- Through-holes: Allow overmold material to flow through and anchor on the opposite side
- Surface texture: Increases contact area and friction; texture depth ranges from 0.0004" (10 microns) for fine textures to 0.006" (150 microns) for heavy textures
Wall Thickness Ratios
Maintain consistent wall thickness to prevent warpage from differential shrinkage:
Recommended overmold thickness ranges from 1.5–3 mm (0.060"–0.120"). The overmold thickness should be less than or equal to substrate thickness to maintain proper cooling balance. Avoid thicknesses below 0.040" unless using specialized materials—thinner layers feel harder and provide less cushion.
Thick sections cause sink marks and long cooling times, while thin sections may not fill completely or provide adequate cushioning.
Draft Angles and Parting Lines
Adequate draft facilitates part ejection without damaging the soft overmold layer:
- Minimum draft: 1° per side for most geometries
- Recommended draft for long draws: 3–5° per side
- Textured surfaces: Require additional draft (1° for fine textures up to 9° for heavy textures)
Parting line placement requires equal attention—position lines to minimize flash visibility and aesthetic impact, especially on consumer-facing surfaces.
Gate Location and Venting
Beyond draft angles, gate placement directly impacts fill quality. Position gates strategically to ensure complete cavity fill without trapping air or creating weld lines in critical areas:
- Flow ratio (L/T): Should not exceed 150:1 (flow length to thickness ratio)
- Vent depth: 0.0005"–0.001" (0.013–0.025 mm) to allow gas escape without creating flash
- Gate sizing: Must be optimized during mold trials to prevent shear-induced material degradation
Proper venting prevents air traps, burn marks, and short shots.
Common Issues and When Overmolding May Not Be Appropriate
Typical Problems
Delamination (separation of overmold from substrate):
- Causes: Incompatible materials, contaminated substrate surface, inadequate mechanical interlocking, or moisture in hygroscopic materials
- Prevention: Select compatible material pairings, ensure substrate cleanliness, design mechanical locks, and dry materials to <0.06% moisture
Flash (excess material at parting lines):
- Causes: Worn tooling, excessive injection pressure, or inadequate shut-off features
- Prevention: Maintain mold surfaces, optimize injection pressure, incorporate 0.015"–0.030" shut-off grooves
Sink marks in thick sections:
- Causes: Thick wall sections cooling unevenly
- Prevention: Maintain consistent wall thickness, increase holding pressure, extend cooling time
Design Mistakes to Avoid
- Inadequate draft angles causing ejection damage to the soft overmold
- Undercuts in the overmold that prevent demolding
- Overmold thickness variations causing warpage
- Insufficient venting leading to air traps or burn marks
- Incompatible material pairings without mechanical interlocking backup
When Overmolding Isn't the Right Choice
Beyond design and process challenges, certain project parameters make overmolding impractical:
- Very low production volumes — Dual-tooling costs may not be justified for volumes below 10,000–25,000 units; adhesives or mechanical fasteners offer more economical alternatives
- Chemically incompatible materials — When materials cannot bond chemically and mechanical bonding alone is insufficient for stress requirements
- Design requires easy disassembly — Products needing repair, component replacement, or recycling benefit from mechanical assembly rather than permanent bonds
- Extremely tight tolerances — Thermal expansion differences between substrate and overmold materials challenge very tight dimensional control
Conclusion
Overmolding is a sophisticated injection molding technique that bonds two or more materials into a single integrated component, delivering functional and aesthetic benefits impossible with single materials.
From medical device handles that combine biocompatible rigidity with soft-touch comfort, to automotive components with integrated seals, to consumer electronics with shock-absorbing bumpers, overmolding enables product designs that improve ergonomics, reduce assembly costs, and enhance performance.
Successful overmolding requires:
- Material compatibility - proven bonding between substrate and overmold materials
- Substrate design - mechanical interlocking features for strong adhesion
- Precise geometry - controlled wall thickness ratios and draft angles
- Experienced partners - manufacturers who understand multi-material processing nuances
When executed properly, overmolding transforms separate components into unified solutions that perform better, feel better, and cost less to produce than assembled alternatives.
Frequently Asked Questions
What is overmolding?
Overmolding is a two-stage injection molding process where one material (typically TPE or rubber) is molded over a pre-molded rigid substrate. This creates a single multi-material part with enhanced functionality, ergonomics, or aesthetics through chemical and/or mechanical bonding.
How does the overmolding process work?
First, mold the rigid substrate with bonding features. Second, position it precisely in a second mold cavity. Third, inject the overmold material to bond onto the substrate. This can be sequential (separate operations) or two-shot (single machine cycle).
What materials are used in overmolding?
Common pairings include rigid substrates (ABS, PC, nylon, PP) with flexible overmolds (TPE, TPU, silicone, LSR). Material compatibility is critical—some combinations bond chemically while others require mechanical interlocking.
Should I use overmolding or insert molding for my part?
Use overmolding for combining two molded plastic/elastomer materials (grips, color contrast, soft-touch surfaces). Use insert molding for embedding pre-fabricated metal components, PCBs, or wire harnesses that aren't molded.
What are the design rules for overmolding?
Ensure material compatibility and design mechanical interlocking features (undercuts, grooves, texture). Maintain overmold thickness of 1.5–3 mm, incorporate 3–5° draft angles, and plan gate/vent locations to prevent air traps.
What products commonly use overmolding?
Medical device handles with soft grips, power tool handles with vibration damping, toothbrushes with ergonomic grips, automotive interior trim with soft-touch surfaces, and consumer electronics with protective shock-absorbing bumpers all leverage overmolding for enhanced functionality and user experience.