Introduction
Most OEM engineers never set foot inside a production mold shop. They see CAD files turn into finished parts, but the controlled chaos between those two endpoints remains invisible—rows of hydraulic presses cycling every 30 seconds, toolroom technicians hand-polishing cavity inserts under magnification, material dryers humming at precise dew points, and operators monitoring cavity pressure signatures that reveal what's happening inside closed steel.
What separates shops that produce jewelry-quality parts from those that merely produce parts never appears in a capabilities brochure. The real indicators are floor-level practices—often invisible to customers—that determine whether your production run delivers consistent parts within thousandths of an inch or generates scrap, rework, and finger-pointing:
- Tracking shot counts and scheduling preventive maintenance before a mold fails
- Logging moisture levels for every hygroscopic resin batch
- Running a documented gate seal study on the first shot rather than relying on guesswork
This article walks you through what actually happens inside a high-performance injection molding facility, from the toolroom where molds are built and maintained to the press floor where parts are produced under continuous quality monitoring.
Key Takeaways
- Mold shops run two zones: the toolroom (CNC/EDM mold building) and the press room (production cycles)
- Material preparation—drying hygroscopic resins to strict moisture thresholds—prevents the majority of common defects before plastic ever reaches the barrel
- The first shot (T1) process includes gate seal validation and dimensional inspection, not just visual approval
- Scientific molding principles and real-time cavity pressure monitoring drive repeatable dimensional control
- DFM reviews and mold flow simulation build quality in before tooling is cut—not after production starts
The Two Zones of a Mold Shop: Toolroom vs. Press Room
Toolroom: Where Molds Are Built and Maintained
When most people picture a mold shop, they imagine rows of injection presses. But a significant portion of the floor belongs to the toolroom—the precision machining center where molds are fabricated, repaired, and maintained.
Standard toolroom equipment includes:
- CNC milling machines for roughing and precision finishing of cores, cavities, and mold bases
- EDM (Electrical Discharge Machining) for creating complex geometries, sharp internal corners, and deep ribs that can't be milled
- Surface grinders for parting line repairs, cavity refinishing after welding, and vent maintenance
- Hand polishing stations for achieving specific SPI surface finishes, from textured to mirror-polish A-1 grades
The toolroom isn't just for new mold fabrication. During production runs, worn cavity inserts are pulled, repaired, and swapped back in to keep presses cycling—a "keep the machine running" mindset that drives most decisions.
Press Room: Where Production Happens
The press room houses injection molding machines rated by tonnage (typically 50 to 500+ tons for custom B2B parts), each with a mold mounted between steel platens. Every press connects to:
- Material drying and conveying systems that deliver resin to the hopper
- Cooling water lines circulating through mold channels
- Hot runner controllers (for multi-cavity or family molds)
- Process monitoring systems tracking cavity pressure, melt temperature, and cycle time
The activity level is constant. Machines cycle every 15 to 60 seconds, and operators pull sample parts at defined intervals. Technicians adjust parameters based on real-time data while material handlers swap gaylords and monitor dryer dew points.
Mold Storage and Preventive Maintenance
Production molds represent significant capital investment—ranging from $15,000 for pre-hardened steel Class 103 molds to over $100,000 for multi-cavity hardened steel Class 101 tools. High-performing shops treat them as critical assets.
Preventive maintenance programs include:
- Trigger maintenance by shot count (every 25,000 to 100,000 cycles), not arbitrary calendar dates
- Verify and descale cooling channels regularly to remove rust and calcium deposits that degrade thermal control
- Lubricate ejector pins, slides, and guide pins on schedule to prevent seizing
- Clean parting lines to clear flash and off-gassing deposits that build up during production
Disciplined shops store molds in climate-controlled areas, apply rust preventatives, and maintain detailed service logs. This prevents the costly emergency repairs that shut down production and delay customer deliveries.
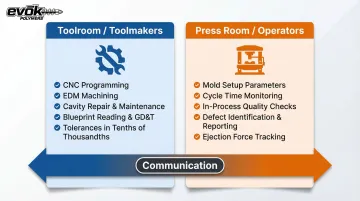
Toolroom vs. Press Operator Skill Sets
All of this—storage discipline, maintenance schedules, and rapid insert swaps—depends on two distinct skill sets working in close coordination. Toolmakers are precision machinists who read blueprints, program CNC equipment, and work to tolerances measured in tenths of thousandths. Press operators focus on setup parameters, cycle monitoring, and in-process quality checks. Both roles require deep technical knowledge, and their communication directly impacts part quality. When a press operator notices a subtle change in fill pattern or ejection force, the toolroom needs that information immediately to prevent defect escalation.
How Material Handling Sets the Stage for Every Run
The Threat of Hydrolysis in Hygroscopic Resins
Thermoplastic resins arrive as pellets, but many engineering-grade materials—Nylon (PA), Polycarbonate (PC), ABS, PET, and TPU—are hygroscopic, meaning they absorb atmospheric moisture deep into the pellet structure.
Processing wet resin causes severe problems:
- Hydrolysis: Moisture triggers a chemical reaction that breaks polymer chains, reducing molecular weight and causing irreversible loss of tensile strength and impact resistance
- Cosmetic defects: Steam bubbles create splay marks, silver streaks, voids, and surface blistering
- Process instability: Reduced melt viscosity leads to over-packing, flash, and poor shot-size control
These aren't minor cosmetic issues. Polycarbonate processed above 0.02% moisture suffers molecular degradation even without visible surface defects.
Drying Parameters: Not Suggestions, Technical Requirements
High-performance shops use desiccant dehumidifying hopper dryers and monitor dew points continuously.
| Resin | Drying Temp | Drying Time | Dew Point Target | Max Moisture |
|---|---|---|---|---|
| Nylon 66 | 80°C (175°F) | 2-4 hours | -18°C to -20°C | <0.2% |
| Polycarbonate | 120°C (250°F) | 2-4 hours | -20°C or lower | <0.02% |
| ABS | 80-95°C | 2-4 hours | -18°C (0°F) | <0.1% |
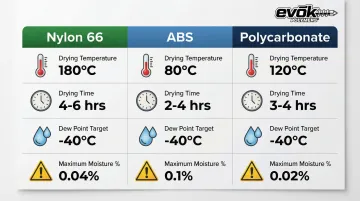
Shops that skip dew point monitoring or rely on hot-air dryers for hygroscopic materials are gambling with every shot. The defects show up downstream—sometimes not until parts are in the field.
Regrind: Balancing Cost Savings with Mechanical Degradation
Drying discipline controls what goes into the barrel. What happens to scrap material after each run is a separate—and equally consequential—decision. To reduce material waste, molders often blend in-house scrap (sprues, runners, rejected parts) as "regrind" mixed with virgin resin. Industry guidance typically limits regrind to 20-30% for standard applications.
The tradeoffs:
- Thermoplastics degrade with repeated thermal cycling, reducing tensile and impact strength
- Glass-filled resins suffer fiber breakage during grinding, altering shrinkage and structural properties
- Inconsistent grinder maintenance produces "fines" (dust) that melt unevenly, causing black specks and discoloration
Shops that manage regrind well track ratios per lot and re-qualify mechanical properties before approving a specific percentage. For structural, medical, or safety-critical applications, regrind requires explicit customer approval and documented testing—no exceptions.
From Mold Setup to First Shot: What Actually Happens
Mold Changeover: Not a 15-Minute Task
Mold changeovers involve more than unbolting one tool and bolting in another. The full process includes:
- Craning the mold onto the platen and aligning it precisely
- Bolting the mold securely and connecting cooling water lines
- Wiring hot runner controllers (if applicable) and verifying electrical connections
- Purging the barrel of previous material to prevent contamination
- Verifying the mold opens and closes cleanly with proper ejection stroke
Traditional changeovers take 2 to 8 hours. Elite shops applying SMED (Single-Minute Exchange of Die) principles reduce this to under 30 minutes by using quick-connect couplings, magnetic platens, and separating "internal" tasks (done while the machine is stopped) from "external" tasks (done while the machine is running).
The Setup Sheet: Starting Point, Not Guarantee
Every mold has a setup sheet specifying process parameters:
- Barrel temperatures across zones
- Injection speed profiles
- Pack and hold pressures
- Cooling time
- Clamp tonnage
Experienced technicians treat this as a starting point. Molds behave differently each time they're mounted due to temperature variations, platen wear, and subtle alignment differences. The setup sheet gets the process close—validation studies confirm it's correct.
First Shot (T1): More Than Visual Inspection
The T1 process begins with a short shot (intentionally under-filling the cavity) to verify fill pattern and gate behavior. Technicians gradually increase shot size, checking for:
- Flash (over-packing)
- Short shots (incomplete fill)
- Sink marks (under-packing over thick sections)
- Weld line positions (where flow fronts meet)
Mold flow simulation conducted before tooling is cut — like the pre-molding design reviews EVOK performs — predicts these exact issues, compressing the trial-and-error phase significantly.
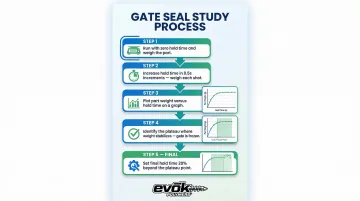
Gate Seal Validation: The Part-Weight Plateau Method
Hold time directly affects part weight, dimensions, and strength. To scientifically determine correct hold time, technicians perform a gate seal study:
- Run the process with no hold time and weigh the part
- Incrementally increase hold time (e.g., by 0.5 seconds) and weigh each part
- Plot part weight against hold time
- Identify the plateau where weight stabilizes (gate has frozen solid)
- Set hold time 20% longer than the plateau point to ensure consistent gate seal
This data-driven approach ensures the process is repeatable by design — not just on the first few shots, but across the full production run. That foundation of process certainty is what makes formal inspection meaningful.
First Article Inspection (FAI)
Before full production begins, a formal FAI verifies dimensional and visual conformance to the part drawing. Standards like AS9102 (aerospace) and PPAP (automotive) define what must be measured, documented, and approved. This checkpoint protects both molder and customer from launching a run that will ultimately yield non-conforming parts.
The Injection Molding Cycle in Real Time
What a Single Cycle Looks Like
From the operator's vantage point, each cycle follows a precise sequence:
- Mold closes and clamps under tonnage
- Plastic injects in under a second for most parts
- Pack and hold pressure fills the cavity completely as material cools and shrinks
- Cooling time runs while the screw recovers (melts) the next shot
- Mold opens, ejector pins fire, and the part drops or is removed by robot
This repeats every 15 to 60 seconds depending on part size and complexity.
Scientific Molding: Why It Matters
Traditional molding uses a single pressure setpoint for the entire injection phase, which creates inconsistency because plastic viscosity varies naturally with temperature and shear rate.
Scientific Molding (Decoupled Molding) separates the process into two distinct phases:
- Velocity-controlled fill: The cavity fills to 95-98% using constant injection speed, decoupled from pressure
- Pressure-controlled pack/hold: The machine switches to pressure control to pack remaining plastic and compensate for shrinkage as it cools
This approach compensates for natural viscosity variations and achieves shot-to-shot consistency measured in thousandths of an inch—the difference between parts that assemble without force and parts that require secondary operations.
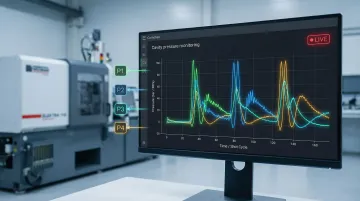
Real-Time Monitoring with Cavity Pressure Sensors
Advanced molding operations install piezoelectric cavity pressure sensors (from vendors like Kistler, RJG, and Priamus) directly inside the mold. These sensors measure the exact pressure of molten plastic inside the cavity, providing a real-time "process signature" for every shot.
Because cavity pressure correlates directly to part weight and dimensional stability, these systems automatically separate good parts from bad without human intervention — catching drift before it becomes a defect.
Cooling Time: How It Drives Piece-Part Cost
Cooling accounts for 50-80% of total cycle time, and it scales with the square of part wall thickness. Doubling wall thickness from 2mm to 4mm doesn't double cooling time — it quadruples it.
Maintaining uniform, minimized wall thickness (typically 1.2–3mm) directly cuts piece-part costs by reducing cycle time — and that's precisely what DFM reviews are designed to catch early. Cooling channel design, water temperature, and mold steel thermal conductivity all affect hourly production rates, but wall thickness remains the single largest variable.
Quality Control, Defects, and What High-Performance Shops Do Differently
In-Process Quality: Continuous, Not End-of-Line
On a well-run floor, operators pull parts at defined intervals for:
- Visual inspection against a "golden sample" (approved reference part)
- Dimensional checks with calipers or CMM for critical features
- Weight verification to detect process drift
High-performance shops apply Statistical Process Control (SPC) to machine-independent parameters like peak cavity pressure, melt temperature, and fill time. By tracking these variables on control charts, they detect process shifts and calculate capability (Cpk) before defective parts are molded.
The Five Most Common Defects and Their Root Causes
| Defect | Description | Root Causes |
|---|---|---|
| Sink Marks | Surface depressions over thick sections | Insufficient pack/hold pressure, inadequate hold time, excessive wall thickness |
| Flash | Excess plastic at parting line | Over-packing, inadequate clamp force, worn mold shutoff surfaces |
| Short Shots | Incomplete cavity fill | Inadequate injection volume/speed, insufficient pressure, blocked venting |
| Weld Lines | Visible lines where flow fronts meet | Low melt temperature, slow injection speed, poor gate placement |
| Warpage | Part distortion upon cooling | Uneven cooling, non-uniform wall thickness, anisotropic shrinkage (glass-filled resins) |
Experienced technicians diagnose defects by reading the part itself—each defect type points to a specific upstream cause.
Reactive vs. Proactive Quality
Reactive shops:
- Catch defects at final inspection and scrap parts
- Adjust process parameters based on trial and error
- React to customer complaints after shipment
Proactive shops:
- Invest in DFM reviews before tooling is released
- Run mold flow simulation to predict sink marks, weld lines, and warpage
- Conduct pre-production process validation (T1 with gate seal studies and FAI)
- Apply Six Sigma frameworks to eliminate root causes before production starts
These decisions—made weeks before production begins—determine long-term part cost and quality. Identifying wall thickness issues, gate placement problems, and cooling inefficiencies during DFM means fixing problems on paper, not scrapping thousands of parts after the mold is already cut.
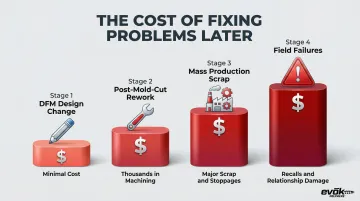
The Cost of Quality Escalation
The Cost of Quality (CoQ) principle makes the financial case for front-loaded quality clear:
- During DFM: Costs almost nothing — a design change in CAD
- After mold cut: Thousands in machining rework
- During mass production: Massive scrap rates and line stoppages
- In the field: Warranty claims, recalls, and damaged customer relationships
The best mold shops maintain detailed process documentation and share it transparently with customers—because open communication about cost structure, process parameters, and design trade-offs allows OEM partners to make informed decisions that optimize both quality and price.
Frequently Asked Questions
What is the process of injection molding?
Resin pellets are dried to precise moisture levels, fed into a heated barrel where they melt, then injected under high pressure into a steel or aluminum mold. The plastic cools until solid, the mold opens, and ejector pins push the part out—a cycle that repeats every 15-60 seconds for most parts.
What are the 5 types of moulding?
The five primary plastic molding processes are injection molding, blow molding, compression molding, rotational molding, and thermoforming. Injection molding dominates high-volume precision manufacturing due to its ability to produce hundreds of thousands of identical, tight-tolerance components at low variable cost.
What is the difference between a mold shop and a molding shop?
A mold shop (or toolroom) focuses on building, repairing, and maintaining the steel or aluminum molds/tooling using CNC, EDM, and grinding equipment. A molding shop operates injection presses to produce parts. Many facilities—including the manufacturing partners EVOK works with—integrate both under one roof, so mold maintenance happens without waiting on external vendors.
How long does it take to set up an injection mold before production?
Mold changeovers typically take 30 minutes to several hours depending on complexity. The first shot sampling and validation process (T1)—including gate seal studies and dimensional inspection—adds additional time before full production is approved.
What causes defects in injection molded parts?
Most defects trace to three root causes: process parameter errors (wrong temperatures, pressures, or speeds), material handling issues (undried resin, contamination, uncontrolled regrind), or design and tooling problems (poor wall thickness, bad gate placement, insufficient cooling). Experienced molders diagnose defects by reading the part itself.
How do you evaluate whether a mold shop is high quality?
Key indicators include scientific/decoupled molding practices, documented setup sheets with SPC monitoring, proactive DFM reviews before tooling is cut, and a preventive mold maintenance program. Transparent communication on process parameters and cost structure matters too. The best shops build quality in from the start—they don't rely on end-of-line inspection to catch what the process should have prevented.