Introduction
Choosing the right prototyping materials and tools can dramatically reduce time-to-market and cut development costs by thousands of dollars for mechanical parts.
Engineers face a persistent challenge: balancing speed, cost, accuracy, and functionality when prototyping mechanical components that must withstand real-world stress, movement, and integration into larger assemblies.
The prototyping landscape in 2024 offers more options than ever across additive manufacturing (FDM, SLA, SLS), subtractive methods (CNC machining), moldmaking (urethane casting), and hybrid techniques. This guide examines both materials and tools, helping you match the right approach to your specific testing objectives and production pathway.
Key Takeaways
- Engineering thermoplastics (Nylon PA12, Polycarbonate, ABS) and metal alloys (aluminum 6061, stainless steel 316L) deliver production-grade functional testing
- FDM printers ($500-$5,000) handle functional testing while SLA/DLP ($2,000-$10,000) capture fine details
- SLS systems ($15,000+) produce support-free nylon assemblies for complex geometries
- Match materials to your mechanical requirements and production pathway to reduce costly redesigns
- Professional prototyping services validate concepts before committing to production injection molding tooling
Overview of Mechanical Parts Prototyping in 2024
Mechanical parts prototyping involves creating functional or representative models of components that will undergo mechanical stress, movement, or integration into assemblies. These prototypes validate design decisions before committing to expensive production tooling.
The field has evolved from traditional machining and moldmaking to modern additive manufacturing:
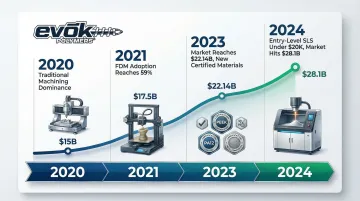
- 67% of engineers now use 3D printing primarily for prototyping, while 21% use it for end-use parts
- FDM (Fused Deposition Modeling) dominates at 59% adoption
- SLA (Stereolithography) follows at 20%
- SLS (Selective Laser Sintering) accounts for 11%
- Multi Jet Fusion represents 7% of usage
The industrial additive manufacturing market reached $22.14 billion in 2023 and is projected to hit $28.1 billion in 2024. This growth reflects several key developments:
- New materials offer production-grade properties (certified ULTEM 1010 CG provides NSF 51 food-safety certification and 216°C heat deflection temperature)
- Software platforms like Onshape have captured 60% of new users from traditional CAD systems
- Entry-level SLS printers now available under $20,000, making industrial-grade equipment more accessible
Best Prototyping Materials for Mechanical Parts
Material selection should be driven by three factors: the prototype's purpose (form/fit/function testing), mechanical requirements, and pathway to production. Choosing materials that simulate production conditions reduces risk before tooling investment.
Engineering Thermoplastics (3D Printing & Machining)
These durable plastics withstand mechanical stress and work with both additive and subtractive manufacturing, making them ideal for functional prototypes that need production-grade mechanical properties.
Engineering Thermoplastics Comparison
| Material | Tensile Strength | Heat Deflection Temp | Best Applications | Prototyping Methods |
|---|---|---|---|---|
| ABS | 46 MPa | 97°C | Housings, enclosures, snap-fits | FDM, CNC machining |
| Nylon PA12 | 48 MPa | >100°C | Gears, brackets, wear surfaces | SLS, MJF, FDM |
| Polycarbonate | 65.5 MPa | 99°C | Impact-resistant parts, covers | FDM, CNC machining |
| PETG | 45 MPa | 62°C | Functional prototypes, fixtures | FDM |
| Ultem (PEI) | 48-81 MPa | 190°C | High-temp applications, medical | FDM (industrial) |
Matching materials to requirements:
- Nylon PA12 excels at wear resistance and living hinges—SLS-printed nylon offers isotropic properties (uniform strength in all directions) without support structures, ideal for assemblies with moving parts
- Polycarbonate delivers impact strength and optical clarity for parts that must withstand drops or require transparency
- ABS handles general-purpose functional testing with good dimensional stability at the lowest cost for iterative prototyping
- Ultem serves high-temperature applications like automotive under-hood components and sterilizable medical devices (requires industrial FDM equipment)
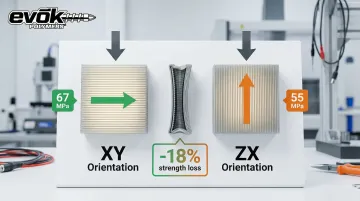
FDM parts show significant Z-axis weakness—Ultem 9085 drops from 67 MPa (XY) to 55 MPa (ZX orientation). Orient load-bearing features in the XY plane during design.
Photopolymer Resins (SLA/DLP 3D Printing)
UV-curable resins deliver exceptional surface finish and detail resolution. While they excel at form and fit verification, most formulations trade durability for precision compared to thermoplastics.
Photopolymer Resin Properties
| Resin Type | Key Property | Tensile Strength | Elongation | HDT @ 0.45 MPa | Best Applications |
|---|---|---|---|---|---|
| Standard | Smooth finish | 40-50 MPa | 10-20% | 40-60°C | Form/fit verification |
| Tough | PP-like resilience | 34 MPa | 155% | 66°C | Snap-fits, flexible assemblies |
| Rigid High-Temp | Stiffness + heat | 55 MPa | 2% | 218°C | Thermal testing, jigs |
| Flexible (80A) | Rubber-like | 4-9 MPa | 100-120% | N/A | Seals, gaskets, grips |
| Castable | Burn-out clean | 30-40 MPa | 5-10% | N/A | Investment casting patterns |
Why designers choose resins:
- Superior surface finish—parts come out smooth without post-processing
- Fine feature resolution down to 50-100 microns captures detailed mechanical assemblies
- Uniform strength in all directions, unlike FDM's layer-dependent properties
Trade-offs to consider:
- UV degradation over time: Carbon RPU 70 retained only 46% elongation after 96 hours UV exposure
- Brittleness in standard resins limits functional testing
- Requires post-curing for optimal properties
Tough resins handle snap-fit testing and assembly verification. Rigid High-Temp formulations withstand thermal cycling tests and fixture applications. Flexible resins work for gaskets, seals, and overmolded grip prototypes, while Castable resins serve as master patterns for metal casting.
Metal Alloys (DMLS, Machining, Casting)
When prototypes must match production strength, thermal behavior, or conductivity, metal becomes essential despite higher costs. This investment pays off by validating high-stress applications and thermal management before committing to production tooling.
Metal Alloy Comparison
| Alloy | Process | Tensile Strength | Yield Strength | Best Applications | Considerations |
|---|---|---|---|---|---|
| Aluminum 6061-T6 | CNC | 290-320 MPa | 240-275 MPa | General structures, brackets | Most cost-effective metal |
| Aluminum 7075-T6 | CNC | 510-580 MPa | 430-505 MPa | High-stress aerospace parts | Higher strength than 6061 |
| AlSi10Mg | DMLS | 241 MPa | N/A | Complex geometries, lightweight | Lower strength than wrought |
| Stainless Steel 316L | DMLS/CNC | >515 MPa | >205 MPa | Corrosion resistance, medical | Biocompatible (medical) |
| Titanium Ti6Al4V | DMLS/CNC | 951-1186 MPa | N/A | Aerospace, implants | Highest strength-to-weight |
Cost and Timeline:
- CNC machining: 1-3 days turnaround, $500-$3,000 per part depending on complexity
- DMLS: Longer lead times (1-3 weeks), higher costs, requires post-processing like HIP (Hot Isostatic Pressing) for ASTM compliance
- Investment casting: 2-4 weeks, cost-effective for 10+ identical parts
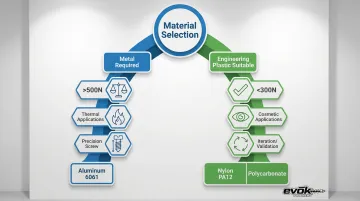
Metal prototyping makes sense for parts experiencing high mechanical loads (>500 N forces), thermal management validation requiring conductivity, or threaded features needing durability for repeated assembly cycles. Production metal parts also warrant metal prototypes for proper validation testing.
Engineering plastics handle loads under 300 N effectively—Nylon or Polycarbonate work well for non-structural cosmetic parts and early-stage design validation before finalizing material selection.
Urethane Casting Materials (RTV Molding)
Urethane casting uses liquid resins cast in silicone molds to produce small batches (10-100 parts) that simulate production plastics. This process fills the gap between single 3D printed prototypes and expensive injection molding tooling.
Urethane Casting Overview
| Aspect | Details |
|---|---|
| Material Properties | Shore hardness from soft (30A) to rigid (80D); colors matched to production specs |
| Process | Create master pattern → make silicone mold → cast urethane parts |
| Mold Life | 20-50 parts typical per mold |
| Timeline | 2-3 weeks for first parts |
| Cost | $250-$1,500 for mold + $20-$50 per cast part |
Best Applications:
- Design verification testing with production-like materials
- Pre-production samples for market testing
- Trade show models requiring realistic appearance
- Bridge manufacturing (25-50 parts) before injection mold tooling
Urethane casting fits specific scenarios: batches of 10-100 parts with consistent properties, production-like material behavior (ABS-like, PC-like, PP-like formulations), or color-matched parts for customer presentations. It's particularly valuable for testing before committing to $15,000-$50,000 injection mold investments.
For fewer than 10 parts, 3D printing offers faster turnaround. Beyond 100 parts, production tooling becomes cost-effective. Skip this process when you need extreme mechanical properties beyond urethane capabilities or rapid iteration (mold changes take time).
Composite Materials & Specialty Options
When standard plastics or metals can't meet weight, stiffness, or flexibility requirements, composites and specialty materials fill the gap.
Specialty Materials Overview
| Material Type | Applications | Prototyping Approaches | Key Properties |
|---|---|---|---|
| Carbon fiber composites | High stiffness-to-weight components, aerospace structures | Hand layup, 3D printed molds for layup | 5x stiffer than aluminum at 60% weight |
| Fiberglass composites | Cost-effective structural parts, enclosures | Hand layup, resin infusion | Good strength at lower cost than carbon |
| Silicone rubbers | Flexible joints, seals, vibration dampening | Silicone casting, overmolding | Shore A 10-80 hardness range |
| TPU/TPE elastomers | Overmolded grips, flexible connectors | Flexible 3D printing filaments | Abrasion resistant, flexible |
Carbon fiber composites suit drone frames, robotic arms, and sporting goods where maximum stiffness meets minimum weight. Silicone rubbers handle gaskets, seals, and soft-touch surfaces requiring durability. TPU filaments enable rapid prototyping of flexible components without the casting process.
Essential Prototyping Tools for Mechanical Parts
The right tools depend on your prototyping approach, in-house capabilities, and project complexity. Most mechanical engineering teams need a combination of additive and subtractive tools plus measurement equipment.
3D Printers for Mechanical Prototyping
FDM printers offer the widest material selection for functional testing, while SLA/DLP technologies excel at fine detail and surface finish. SLS produces production-like parts without support structures, making it ideal for complex assemblies.
3D Printer Technology Comparison (2024)
| Technology | Price Range | Build Volume | Resolution/Accuracy | Best For |
|---|---|---|---|---|
| FDM | $500-$5,000 | 200-300mm typical | ±0.2mm or ±0.2% | Functional testing, engineering thermoplastics |
| SLA/DLP | $2,000-$10,000 | 125-265mm typical | 50-90 µm; ±100 µm | Detail parts, form/fit verification |
| SLS | $15,000-$200,000+ | 200-600mm typical | 60 µm layers | Production-grade nylon, complex assemblies |
Recommended Models (2024):
- FDM Entry: Prusa MK4 ($1,099), Bambu Lab X1 Carbon ($1,199)—proven reliability and material compatibility
- FDM Industrial: UltiMaker Factor 4 (~$20,000)—engineering-grade thermoplastics with enclosed chamber
- SLA: Formlabs Form 4 ($4,500)—50 µm XY resolution, 200x125x210mm build volume
- SLS Entry: Formlabs Fuse 1+ (~$18,500)—accessible entry to production-grade nylon prototyping
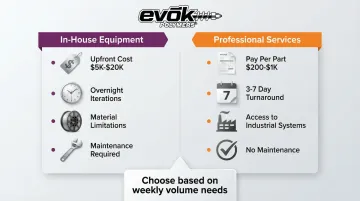
Professional Services Alternative:
Teams without equipment budgets can access industrial systems through professional 3D printing services. Protolabs, Xometry, and specialized providers deliver parts in 3-7 days at $200-$1,000 per part depending on technology and size.
CNC Machines & Subtractive Tools
While 3D printing excels at complex geometries, CNC machining becomes essential for different requirements. Engineers prefer CNC when prototypes need tight tolerances, threaded features, or production material validation. Machined parts offer uniform strength in all directions—something layered 3D printing cannot match.
The following equipment types address different machining needs:
CNC Machining Overview
| Equipment Type | Capabilities | Desktop Options (2024) | Service Bureaus |
|---|---|---|---|
| CNC Mills | 3-axis for basic parts; 4/5-axis for complex geometries | $5,000-$20,000 (Bantam Tools, Tormach 440) | Protolabs, Xometry, Fictiv |
| CNC Lathes | Cylindrical parts, shafts, threaded components | $8,000-$25,000 | 3-7 day turnaround |
| Tolerances | ±0.005" (±0.127mm) standard; ±0.001" precision | Desktop: ±0.002-0.005" | Service: ±0.001" available |
When CNC is Preferred Over 3D Printing:
- Tight tolerances required (±0.001" or better)
- Threaded features that will be assembled repeatedly
- Production material validation (machined from actual production stock)
- Uniform strength required in all directions
- Surface finish critical for sealing or sliding surfaces
Desktop CNC Options:
- Tormach 770M: $11,574-$33,012—capable of aluminum and steel machining
- Bantam Tools Desktop CNC: ~$5,000—ideal for small precision parts
- Carbide 3D Nomad: ~$2,800—entry-level for plastics and soft metals
Outsourcing Recommendation:
Outsource CNC machining initially. Service bureaus deliver parts in 3-7 days at $500-$3,000 per part, eliminating equipment investment, tooling costs, and programming expertise requirements. Consider in-house equipment only when weekly machining needs justify the investment.
CAD Software for Mechanical Design
Before manufacturing any prototype, you need solid design files. Professional CAD software creates manufacturable designs and communicates specifications to prototyping services. The right platform depends on team size, collaboration needs, and budget.
CAD Software Comparison (2024)
| Category | Software | Annual Cost | Best For |
|---|---|---|---|
| Entry-Level | Fusion 360 | ~$545/year | Small teams, hobbyists (free tier available) |
| Onshape | ~$1,500/year | Distributed teams, cloud collaboration | |
| FreeCAD | Free (open-source) | Budget-constrained projects | |
| Professional | SolidWorks | ~$3,995 + $1,295/year | Industry standard, established companies |
| Siemens NX | ~$4,889/year | Large enterprises, complex assemblies | |
| PTC Creo | ~$2,780/year | Manufacturing-focused workflows |
Key Capabilities for Mechanical Prototyping:
Look for these essential features when selecting CAD software:
- Parametric modeling for automatic design change propagation
- Assembly constraints and motion studies
- FEA simulation for stress analysis
- Drawing generation with GD&T callouts
- Direct export to 3D printing and CNC formats
2024 Recommendation:
- Fusion 360: Best for startups and small teams. Free for hobbyists, affordable commercial license, integrated CAM for CNC
- SolidWorks: Industry standard for established companies. Largest user base means abundant training resources and service bureau compatibility
- Onshape: Capturing 60% of new users from SolidWorks due to cloud-native collaboration—ideal for distributed engineering teams
Design for Manufacturing (DFM) Integration:
Learn DFM principles within your CAD environment. Most professional CAD packages include design analysis tools that flag manufacturability issues like undercuts, thin walls, and sharp internal corners before prototyping.
Measurement & Testing Equipment
Validating that prototypes meet dimensional tolerances and functional requirements is essential. Measurement data informs design iterations and catches errors before expensive tooling.
Essential Measurement Tools
| Equipment | Accuracy | Cost | Application |
|---|---|---|---|
| Digital Calipers | ±0.01mm | $50-$300 | Basic dimensional verification |
| Micrometers | ±0.5 µm | $200-$500 | Precision measurements (Mitutoyo quality) |
| CMM (Portable Arms) | ±0.025-0.050mm | $15,000+ | Complex 3D geometry verification |
| Force Gauges | ±0.5% | $300-$2,000 | Snap-fit forces, spring rates, breaking strength |
| 3D Scanners | 20-100 µm | $5,000-$50,000 | Reverse engineering, as-built verification |
Minimum Measurement Toolkit:
Equip your workspace with these essentials:
- Digital calipers (Mitutoyo or Starrett, ~$150) for daily dimensional checks
- Digital micrometer (~$300) when measuring features under 25mm
- Pin vise and drill bits for adjusting hole sizes in prototypes
- Force gauge (~$500) to validate snap-fit and spring forces
When to Use Service Bureau Measurement:
Complex geometries or first article inspection warrant outsourcing to measurement services. CMM inspection with full dimensional reports provides GD&T verification against CAD models without $50,000+ equipment investment.
Hand Tools & Finishing Equipment
Post-processing tools transform raw prototypes into testable parts. Even with advanced manufacturing, hand finishing is often necessary for assembly, fit, and appearance.
Post-Processing Essentials
| Category | Tools | Purpose |
|---|---|---|
| Basic Hand Tools | Files, sandpaper (80-2000 grit), hobby knife, pin vise & drill bits, taps & dies | Surface smoothing, hole adjustments, threading |
| Power Tools | Dremel rotary tool, benchtop belt sander, drill press, heat gun | Material removal, surface finishing, thermoforming |
| Finishing Supplies | Primer & paint, epoxy putty, cyanoacrylate glue, acetone (ABS smoothing), polishing compounds | Appearance improvement, gap filling, assembly |
| Assembly Hardware | Metric/Imperial screw assortments, threaded inserts (brass, heat-set), adhesive selection (CA, epoxy, acrylic) | Prototype assembly, testing |
Professional Finishing Techniques:
Proper finishing transforms prototypes from "maker projects" to professional validation tools:
- Layer line removal (FDM): 80-grit sanding → 220-grit → 400-grit → primer → wet sand 600-grit → paint
- Support mark removal (SLA): Flush cutters → 320-grit wet sand → 600-grit → polish
- Vapor smoothing (ABS): Acetone vapor bath for glass-like surface (requires ventilation)
- Threaded inserts: Heat-set brass inserts enable repeated assembly without thread wear
Investment in finishing supplies ($200-500) dramatically improves prototype quality for customer presentations and functional testing.
How to Choose the Right Materials and Tools
Match your prototyping approach to project stage, testing requirements, and budget. Early-stage prototypes have different needs than pre-production validation samples.
Define Your Prototyping Objectives
Clarify what you're testing before selecting materials and tools. Prototypes serve different purposes along the development timeline.
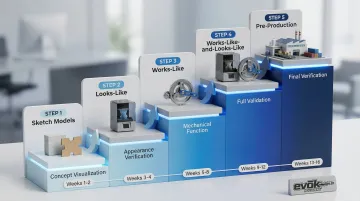
The Fidelity Ladder progresses through five stages:
- Sketch models (foam, cardboard)—concept visualization
- Looks-like prototypes (SLA, painted)—appearance verification
- Works-like prototypes (FDM, SLS)—mechanical function testing
- Works-like-and-looks-like (urethane casting, finished)—full validation
- Pre-production samples (production tooling T1 shots)—final verification
Decision tree by testing focus:
- Form testing (appearance): Prioritize surface finish → SLA/DLP with finishing
- Fit testing (dimensional accuracy): Emphasize tight tolerances → CNC machining or SLS
- Function testing (mechanical performance): Focus on material properties → Engineering thermoplastics (SLS Nylon, FDM Polycarbonate) or metal
Build multiple prototype types instead of creating one "perfect" prototype. Parallel versions let you test different aspects simultaneously:
- Cosmetic prototype (SLA, painted) for stakeholder presentations
- Functional prototype (SLS Nylon) for mechanical testing
- Machined prototype (aluminum) for production material validation
This parallel approach costs more upfront but reduces iteration cycles by testing multiple aspects at once.
Consider Your Path to Production
Once you've defined your testing objectives, align your prototyping materials with your intended manufacturing method. Using similar materials and processes during prototyping reveals production challenges early.
Prototyping for manufacturing validation:
| Production Method | Recommended Prototype Approach | Why |
|---|---|---|
| Injection molding | SLS Nylon PA12, urethane casting | Simulates thermoplastic behavior, tests draft angles |
| CNC production | Machined prototypes from production stock | Validates material properties, surface finish |
| Die casting | Machined aluminum prototypes | Tests thermal properties, thread engagement |
| Sheet metal fabrication | 3D printed forming tools + hand-formed metal | Validates bend radii, tolerances |
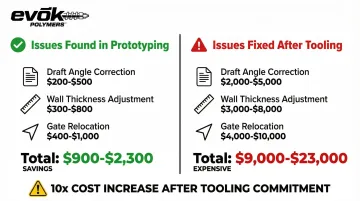
For parts destined for injection molding, some manufacturers like Evok Polymers provide integrated services spanning prototyping through production. This includes SLA and FDM prototyping to validate designs, followed by production-grade P-20 steel molds. Involving manufacturing partners during the prototyping phase delivers DFM feedback on draft angles, wall thickness, and gate locations before tooling investment.
Work with manufacturing partners early. They can identify issues like:
- Undercuts requiring expensive side actions
- Wall thickness variations causing sink marks
- Gate locations creating weld lines in critical areas
- Draft angles insufficient for ejection
Addressing these during prototyping costs hundreds of dollars; fixing them after tooling costs thousands.
Balance Speed, Cost, and Quality
Apply the right level of investment to each iteration. Fast and cheap prototypes work for early iterations; invest in quality for validation testing.
Cost and timeline benchmarks:
| Method | Lead Time | Cost per Part | Best Use Case |
|---|---|---|---|
| FDM 3D printing | 1-3 days | $50-$500 | Rapid iteration, functional testing |
| SLA/DLP printing | 2-5 days | $100-$800 | Form/fit verification, detailed parts |
| SLS printing | 3-7 days | $200-$2,000 | Production-like nylon parts, assemblies |
| CNC machining | 5-10 days | $500-$3,000 | Precision metal/plastic, production material |
| Urethane casting | 14-21 days | $1,000-$5,000 (20 parts) | Bridge manufacturing, market testing |
The "70% Solution" approach recognizes that early prototypes don't need perfection. A prototype that's 70% accurate but available in 3 days enables faster learning than a perfect prototype in 3 weeks. Reserve high-fidelity prototyping for validation stages where accuracy matters.
Cost-quality matrix for iteration cycles:
- Iteration 1-3 (concept validation): FDM prototypes, minimal finishing, focus on speed
- Iteration 4-5 (design refinement): SLS or machined prototypes, functional testing
- Iteration 6 (final validation): Urethane cast parts or T1 production samples, full testing
Ordering CNC parts in batches significantly reduces per-unit cost. According to industry cost analysis, batches of 10 reduce costs to $300 (from $500 single), while batches of 50+ can drop costs by 60% ($120/unit). Plan prototype quantities strategically—order extras for destructive testing, customer samples, and future reference.
Conclusion
Successful mechanical prototyping requires matching materials and tools to specific testing objectives and production pathways. The 2024 landscape offers unprecedented options—from $500 desktop FDM printers to industrial SLS systems, from rapid SLA prototypes to precision CNC machining.
Selection demands understanding trade-offs between speed, cost, accuracy, and material properties.
Engineering thermoplastics like Nylon PA12 and Polycarbonate deliver production-grade strength for functional testing. Photopolymer resins provide unmatched detail for form and fit verification. Metal prototyping validates high-stress applications. Urethane casting bridges the gap between single prototypes and production volumes.
When your complex mechanical parts are destined for injection molding, partnering with specialists who understand both prototyping and production tooling can accelerate your development timeline. EVOK Polymers guides material selection, creates functional prototypes using SLA and SLS technologies, and transitions directly to production tooling—eliminating handoffs between vendors.
Frequently Asked Questions
What's the best prototyping method for injection molded parts?
SLS 3D printing with Nylon PA12 most closely simulates injection molded properties with isotropic strength and production-like behavior. Urethane casting produces 20-50 parts with ABS-like or PC-like properties for extensive testing. Work with injection molding experts to get DFM feedback on draft angles, wall thickness, and gate locations before committing to tooling.
How much does mechanical prototyping typically cost?
DIY 3D printing costs $50-$200 per part, professional 3D printing services run $200-$1,000, and CNC machining ranges from $500-$3,000 per part. Urethane casting costs $1,000-$5,000 for a 20-part run including mold. Volume discounts on batches of 10+ CNC parts can reduce per-unit costs by 40-60%.
Can I use 3D printed parts for functional testing?
Engineering thermoplastics like Nylon PA12 (SLS), Polycarbonate, and Ultem (high-end FDM) handle significant mechanical testing, with SLS Nylon achieving 48 MPa tensile strength. Limitations include FDM's Z-axis weakness and photopolymer UV degradation. For loads exceeding 500 N or high-cycle testing, use CNC machined or metal prototypes.
How do I choose between in-house prototyping and outsourcing?
Outsource initially to get professional results without equipment investment or learning curve. Consider in-house equipment when weekly prototyping needs exceed $500-$1,000 monthly in outsourcing costs, or when overnight iteration cycles provide competitive advantage.
What's the difference between rapid prototyping and low-volume production?
Rapid prototyping creates 1-10 parts for design validation using 3D printing or CNC machining. Low-volume production (50-5,000 parts) bridges prototyping and full production using urethane casting, 3D printing at scale, or soft tooling. This validates market demand before investing in production tooling costing $15,000-$100,000+.
How long does it take to prototype mechanical parts?
In-house 3D printing delivers parts in 1-3 days, while service bureau 3D printing or CNC machining takes 5-10 days. Urethane casting requires 2-3 weeks for mold creation and first parts. Plan 2-3 weeks per iteration cycle for design changes, fabrication, and testing—total development typically spans 8-16 weeks from concept to production-ready design.